LAN-Only DNS + Trusted SSL + Reverse Proxy with Auto-Generated Subdomains
How to configure LAN-only DNS + Trusted SSL with a reverse proxy (SWAG) and auto-generated subdomains using only docker containers
So, you wanna set up SSL with LAN-only services for your reverse proxy and thought it would be easy

Dang it’s hard to find a tutorial and why does this one require port forwarding? And this one wants me to install nginx locally? And this one doesn’t explain the LAN-only part? And this…
Yeah, I know. There’s a ton of information but none of it is concise or exhaustive. And who isn’t using docker containers these days? Don’t worry, I suffered through all of the trial-and-error so you can reap the benefits.
Summary
At the end of this tutorial you will have:
- A SWAG (nginx reverse proxy) container with Trusted CA Signed SSL certificates for your domain using Let’s Encrypt that:
- does not require port forwarding or any other public-internet exposure to authenticate certs
- can automatically configure subdomains for containers on one or more docker hosts
- A DNS container that redirects your LAN-only requests to the SWAG container
While I will use my own preferences for the tech stack here the general concepts are applicable as long as your alternative supports the same authentication and DNS approaches.
Prerequisites
- Have registered and have control over your own domain name at a domain registrar
- Docker and docker-compose installed
- Can modify the DNS/DHCP configuration for your LAN network (through your router or w/e)
Additionally, given examples assume the user is using Linux/macOS.
Step 1: Domain and DNS Challenge
This is the most important part and the main key to enabling you to acquire Trusted SSL certs without any publicly-accessible services.
When you request an SSL certification for a domain the cert provider requires that you validate that you are the actual owner of that domain through a challenge.
Rather than using the common HTTP challenge1 we want to use a DNS challenge. Instead of requiring access to your web server in order to validate a response from the cert client the DNS challenge works by:
- Cert client (in SWAG container) accesses your domain’s DNS service through the DNS provider’s API
- Adds an additional, informational DNS
TXTrecord with uniqueToken A - Contacts the cert provider and tells it that it should see
Token Ain that DNS record for your domain - Cert provider checks your domain’s DNS records for this token
- Adds an additional, informational DNS
- If the token is found then it proves you have access to the domain and the provider issues the cert
Using this challenge, then, does not require that your web server (or reverse proxy) is publicly accessible in order for the cert client to validate the domain and generate certs. Hooray!
Choosing A DNS Provider
With that in mind its (obviously) important to choose a DNS provider that supports DNS challenge through their API. Thankfully, there are many options out there and our reverse proxy, SWAG, supports 50+ providers with easy configuration.
It’s also important that the DNS provider we choose supports wildcard subdomains. Without wildcard support we will need to list out every subdomain we want to validate for, before the certs are created, which defeats the point of being able auto-generate subdomains later.
For this tutorial I will be using Cloudflare (which does support wildcards) but, as mentioned at the top, this can be applied to any DNS provider that supports DNS challenge and wildcards!
If your domain registrar/DNS provider does not support DNS challenge validation you can resolve this by signing up at a DNS provider that does (like Cloudflare) and then change the DNS name server records for your domain to the new DNS provider.
Configuring Cloudflare API
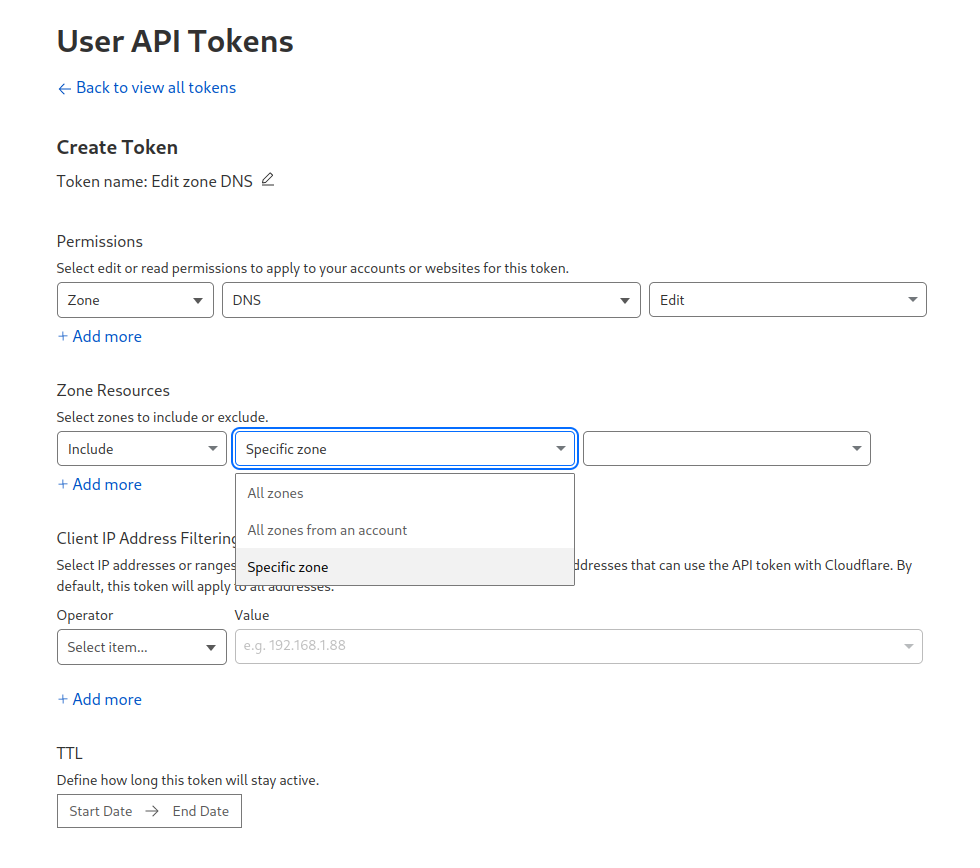
- Navigate to https://dash.cloudflare.com/profile/api-tokens
- Select Create Token
- Select Use template for
Edit zone DNS- Under Zone Resources:
- Set
Include - To allow the token to edit all DNS for all sites in your account use
All Zones
- To restrict token to a specific site
Specific zone- Choose the site from the next dropdown list
- Under TTL, select Start/End dates, or leave untouched for no expiration of these permissions.
- Set
- Create Summary -> Create Token
- Under Zone Resources:
After the token is created save it for the next step…
Step 2: Setup and Configure Reverse Proxy
Now we will create our reverse proxy (SWAG) for serving sites from within our LAN and configure it to create certs using a DNS challenge from Let’s Encrypt.
Guides for configuring other reverse proxies with DNS challenge:
The instructions below are largely reproduced from SWAG documentation.
Create a docker-compose configuration for swag
1
2
3
4
5
6
7
8
9
10
11
12
13
14
15
16
17
18
19
20
services:
  swag:
    image: lscr.io/linuxserver/swag
    container_name: swag
    environment:
      # on linux run 'id $user' to get uid => PUID and guid => PGID
      # https://docs.linuxserver.io/general/understanding-puid-and-pgid/
      - PUID=1000
      - PGID=1000
      - TZ=America/New_York
      - URL=MY_DOMAIN.com
      - SUBDOMAINS=wildcard
      - VALIDATION=dns
      - DNSPLUGIN=cloudflare
    volumes:
      - /home/host/path/to/swag:/config
    ports:
      - 443:443
      - 80:80
    restart: unless-stopped
Make sure to replace /home/host/path/to/swag with a real path on your host machine.
Run the container for the first time to generate all the configuration defaults:
1
2
# from ~/stacks/swag dir
docker-compose up
The container will fail due to missing cloudflare configuration but that is ok! Now we have configuration created in /home/host/path/to/swag.
Now edit the cloudflare dns challenge configuration for swag:
- Comment out
global api keyentries - Uncomment
with tokenentries and replace token with the one we generated earlier
1
2
3
4
5
6
7
8
9
# Instructions: https://github.com/certbot/certbot/blob/master/certbot-dns-cloudflare/certbot_dns_cloudflare/__init__.py#L20
# Replace with your values

# With global api key:
#dns_cloudflare_email = cloudflare@example.com
#dns_cloudflare_api_key = 0123456789abcdef0123456789abcdef01234567

# With token (comment out both lines above and uncomment below):
dns_cloudflare_api_token = OUR_API_TOKEN
Remove/restart the container to get validation to succeed.
1
2
3
# If container is still running
docker-compose down
docker-compose up -d
We did it, Reddit?
If no errors appear in the log (docker-compose logs) you have successfully validated with a DNS challenge! Your reverse proxy now has valid certs without ever becoming publicly accessible. Congratulations.
At this point the rest of the tutorial is optional. If you are fine with manually editing /etc/hosts files and configuring your subdomains manually in nginx then feel free to close this tab and celebrate victory. Otherwise, keep on reading for how to auto-generate subdomain proxies and setup local DNS.
Step 3: Setting up LAN-only DNS
It Ain’t Magic
What gives?? I’ve got my reverse proxy setup. Certs are validated. With my normal public-facing proxy all I needed was an A record and wildcard CNAME and subdomains just worked!

Well we didn’t do that! In fact, we didn’t setup any DNS records at all other than generating TXT record required for the DNS challenge. Even after setting up subdomain proxies in SWAG (nginx) the machines on your LAN:
- do not know the reverse proxy exists, there are no public DNS records.
- do not know it should look for every subdomain at the reverse proxy, again there are no public DNS records.
Technically, yes, you could skip this entire section by setting this up in your public DNS records:
- A Record:
Reverse Proxy Local IP - CNAME Record:
*toMY_DOMAIN.com
but this exposes details about your private network! Yes, a simple A record with an unreachable internal IP is potentially harmless but why risk it? And what if you want to add more complicated behavior later, exposing more details? IMO security by design is the best approach especially for a homelab where you probably want to set-and-forget.
So, what do now? Well, you’ve read the section header so I haven’t really buried the lead but *queue scary music* yes we have to host our own DNS. Every self-hoster wants to avoid it but it’s an inevitability if you do not want to expose any details about your private network. Sorry!
Fortunately, the solution is pretty idiot-proof with the added benefit of network-side ad-blocking (if you so wish) for zero cost: Technitium DNS is a full-fat authoritative and recursive DNS server with a ton of goodies built in. It works out-of-the-box and we use it like normal DNS so there’s no “gotchas” to configuring it. It also happens to be dockerized, of course.
What about Pi-hole?
Pi-hole is a great solution for a dns-based/network-wide adblock but, IMO, it’s a poor “full-fat” DNS server. Its primary purpose is for blocking ads, not authoritative DNS administration so it’s missing many of the features Technetium offers for complete control over your network’s DNS. Namely, for our use case, it does not support wildcard in local DNS records without modifying the underlying dnsmasq instance which is outside the scope of pi-hole configuration.
If you have an existing Pi-hole configuration and really really do not want to switch to Technitium (it can do the same full ad-blocking with upstream DNS like Pi-hole) you can modify dnsmasq using one of the solutions from the above-linked discussion or manage your domains without the benefit of wildcards by using Pi-hole’s Local DNS features. Here’s another article explaining how to use those features.
TL;DR Domain Management in Pi-hole
Open the Pi-hole dashboard, then:
- Local DNS -> DNS Record
- Domain:
MY_DOMAIN.com - IP Address:
Reverse Proxy Local IP
- Domain:
- Local DNS -> CNAME Records
- For each subdomain add a CNAME pointing back to the same domain
- Domain:
subdomain.MY_DOMAIN.com - Target Domain:
subdomain.MY_DOMAIN.com
Setup and Configure Technitium
Create Technitium Container
Make a copy of the official Technitium docker-compose.yml on your machine. My recommended changes:
- uncomment
network_mode: "host"- ensures technitium gets all the ports it needs and
- it has access to all the correct bound network interfaces if you decide to restrict access using this later
- replace the
configvolume with a dir on your host machine so that the instance data is portable- useful if you decide to run a failover instance
Now create/start the container
1
2
# from ~/stacks/technitium dir
docker-compose up -d
You’ll be required to setup an admin user/password after connect the first time you connect to the web interface at http://HOST_IP:5380
Configuring Technitium
There are numerous configurable features but we are only interested in minimum settings required for server our reverse proxy. For ad-blocking see the Recipes below.
Settings -> General -> DNS Server Local End Points
These are the interfaces IP addresses Technitium will listen for DNS record requests on. Since your network is private and secure (right??) the easiest way to set this is up is to listen on everything. Once you have confirmed your configuration is fully working interfaces can be removed and the setup tested to ensure its still working as expected.
The middle IP address should be the IP address of the host machine on your LAN.
1
2
3
0.0.0.0:53
192.168.0.42:53
[::]:53
Create DNS Zone
Now we will configure a new DNS record for your LAN-only domain so Technitium knows where to point machine when they ask for DNS records about it.
Navigate to Zones tab and select Add Zone
- Zone:
MY_DOMAIN.com - Primary Zone
- Select Add to create the new Zone
Navigate to the newly created Zone in the list, then select Add Record:
- Name:
@ - Type:
A - IPv4 Address:
Reverse Proxy Host Machine IP - Then Save
select Add Record once more:
- Name:
* - Type:
A - TTL:
3600 - IPv4 Address:
Reverse Proxy Host Machine IP - Then Save
And we’re done! Technitium is now configured to point any requests, for any subdomain, to your reverse proxy.
Configure Network DNS
Lastly, you will need to configure your LAN’s DHCP server to provide the IP address of the host Technitium is running on as a DNS server. This is usually done in your router and is left as an exercise to the reader.
You can, however, test everything works by manually setting the DNS server value on your own machine first.
After making the DHCP change all clients on your network will need to release/renew their leases before the new DNS change takes affect.
We did it, Reddit!
Ok for real this time it’s done! The magic is inside the computer! You can now create subdomain proxies manually or using SWAG’s presets to point to any container or service you have running and will be able to access them from any machine on your LAN!
However, if you are not satisfied with copy-pasting proxies for every service you have running and would rather have it automated read on…
Step 4: Auto Generating Subdomains
Solutions for proxy auto-gen with other reverse proxies:
- Caddy: Caddy-Docker-Proxy plugin
- Traefik: Built-in functionality
Linuxserver docker containers, which SWAG is built on, support add-on mods which provide additional functionality to their containers with the inclusion of one or two additional ENVs. They are extremely awesome. Particularly for us, the Auto-proxy mod adds scripting to SWAG to generate subdomain proxy files based on docker labels found on containers running on the same docker host SWAG is on.
I’ve taken the liberty of enhancing this mod by enabling it to generate these proxy files from multiple docker hosts, not just on the same machine as SWAG. My mod (pull request), I’ve named auto-proxy-multi, provides additional functionality:
- smart guessing for remote host Web port
- per-host TLD
- per-host suffix or prefix container
to allow effective mixing of public/private proxying as well as multiple same-name containers based on the host the container is located at.
Since our tutorial only deals with a single Docker host we will not use most of these settings but the full documentation for these can be found at the github repository – https://github.com/FoxxMD/docker-mods/tree/swag-auto-proxy-multi – and recipes for multi-host scenarios can be found below.
A reminder that SWAG will happily use any manually configuring proxies alongside any auto-generated ones. Make sure to check out the presets created for you by SWAG.
Configuring SWAG Mod
Modify docker-compose.yml for SWAG from Step 2 to include these environmental variable:
1
2
3
environment:
  - DOCKER_MODS=linuxserver/mods:universal-docker|foxxmd/auto-proxy-multi
  - AUTO_PROXY_HOST_TLD=MY_DOMAIN.com
and restart the container. The mods will download and install without interaction and can be monitored in the logs.
Configuring Containers
Refer to auto-proxy labels for more information on configuring individual containers. To enable a container to have a subdomain proxy auto generated for it add the label swag=enable to the container and restart it. After ~60s SWAG will pick up the change and the container will then be available at container_name.MY_DOMAIN.com.
 auto-proxy is David Blaine and the Cheez-its are your containers, it’s *magic*
There you have it. LAN-only SSL with no private network details leaked and auto generated subdomain proxies, all using portable docker containers. Enjoy bragging to all your publicly-exposed, neanderthal friends using cloudflare tunnels!2
Recipes
The following are very succinct approaches and tips for doing more with your newfound setup. I’ll expand on these if requested.
Additional Domain Validation with SWAG
To have SWAG generate certificates for additional domains (IE you host more than one domain from the same reverse proxy) add the following environmental variables to the SWAG docker-compose.yml
1
2
3
environment:
  - ONLY_SUBDOMAINS: false
  - EXTRA_DOMAINS: "*.MY_EXTRA_TLD.com,MY_EXTRA_TLD.com"
Add even more domains by separating with a command in EXTRA_DOMAINS following the same formula.
If you use additional (public) domains and have subdomains you want to remain LAN-only it is critical the
server_namedirective in their proxy files is not*. Explicitly specify the domain likeserver_name: subdomain.my_interal_tld.com;and if use auto-generated proxies ensure per host TLD is configured.
Multi-domain + Multi-host Auto Generation Examples
Every “remote” docker host, IE any docker host that is connected to by IP address from SWAG, should have limited permissions rather than full-access. Start a docker-socket-proxy container on each remote host with CONTAINERS=1 env/permission.
docker-socket-proxy docker-compose.yml
1
2
3
4
5
6
7
8
9
10
11
12
13
14
services:
  socket-proxy:
    image: lscr.io/linuxserver/socket-proxy:latest
    container_name: socket-proxy
    ports:
      "2375:2375"
    environment:
      - CONTAINERS=1
    volumes:
      - /var/run/docker.sock:/var/run/docker.sock:ro
    restart: unless-stopped
    read_only: true
    tmpfs:
      - /run
All Docker hosts are remote
Click to expand
Assumptions:
MY_DOMAIN.COMis our domain for public-facing services- All these services run on a docker host at 192.168.0.20
- EX running containers with label
swag=enable:overseer nextcloud privatebin
- EX running containers with label
- All these services run on a docker host at 192.168.0.20
MY_EXTRA_TLD.COMis our domain for LAN-only services- All these services run on a docker host at 192.168.0.10
- EX running containers with label
swag=enable:paperless plex
- EX running containers with label
- All these services run on a docker host at 192.168.0.10
1
2
3
4
5
6
7
8
9
10
11
12
13
14
15
16
17
18
19
20
21
22
23
24
services:
  swag:
    image: lscr.io/linuxserver/swag
    container_name: swag
    environment:
      - PUID=1000
      - PGID=1000
      - TZ=America/New_York
      # Domain/Subdomain/Wildcard cert setup
      - URL=MY_DOMAIN.com
      - SUBDOMAINS=wildcard
      - ONLY_SUBDOMAINS: false
      - EXTRA_DOMAINS: "*.MY_EXTRA_TLD.com,MY_EXTRA_TLD.com"
      - VALIDATION=dns
      - DNSPLUGIN=cloudflare
      # Proxy auto-gen setup
      - DOCKER_MODS=linuxserver/mods:universal-docker|foxxmd/auto-proxy-multi
      - DOCKER_HOST=192.168.0.20|public|MY_DOMAIN.com,192.168.0.10|lan|MY_EXTRA_TLD.com
    volumes:
      - /home/host/path/to/swag:/config
    ports:
      - 443:443
      - 80:80
    restart: unless-stopped
Result:
- overseer.MY_DOMAIN.com
- nextcloud.MY_DOMAIN.com
- privatebin.MY_DOMAIN.com
- paperless.MY_EXTRA_TLD.com
- plex.MY_EXTRA_TLD.com
Local Docker Host + 1 Remote Docker Host
Click to expand
Assumptions:
MY_DOMAIN.COMis our domain for public-facing services- All these services running on same docker host as SWAG (access through
docker.sock)- EX running containers with label
swag=enable:nextcloud
- EX running containers with label
- All these services running on same docker host as SWAG (access through
MY_EXTRA_TLD.COMis our domain for LAN-only services- All these services run on a docker host at 192.168.0.10
- EX running containers with label
swag=enable:paperless plex
- EX running containers with label
- All these services run on a docker host at 192.168.0.10
1
2
3
4
5
6
7
8
9
10
11
12
13
14
15
16
17
18
19
20
21
22
23
24
25
26
27
28
29
30
services:
  swag:
    image: lscr.io/linuxserver/swag
    container_name: swag
    environment:
      - PUID=1000
      - PGID=1000
      - TZ=America/New_York
      # Domain/Subdomain/Wildcard cert setup
      - URL=MY_DOMAIN.com
      - SUBDOMAINS=wildcard
      - ONLY_SUBDOMAINS: false
      - EXTRA_DOMAINS: "*.MY_EXTRA_TLD.com,MY_EXTRA_TLD.com"
      - VALIDATION=dns
      - DNSPLUGIN=cloudflare
      # Proxy auto-gen setup
      - DOCKER_MODS=linuxserver/mods:universal-docker|foxxmd/auto-proxy-multi
      # Local (docker.sock) detected automatically when provided in volumes
      # and not described through DOCKER_HOST, so instead set default TLD for all docker
      - AUTO_PROXY_HOST_TLD=MY_DOMAIN.com
      # then explicitly specify TLD (override) for remote host
      - DOCKER_HOST=192.168.0.10|lan|MY_EXTRA_TLD.com
    volumes:
      - /home/host/path/to/swag:/config
      # add docker.sock to detect containers on same host as SWAG
      - /var/run/docker.sock:/var/run/docker.sock:ro
    ports:
      - 443:443
      - 80:80
    restart: unless-stopped
Result:
- nextcloud.MY_DOMAIN.com
- paperless.MY_EXTRA_TLD.com
- plex.MY_EXTRA_TLD.com
Ad-block with Technitium
From the Technitium dashboard nagivate to Settings -> Blocking -> Allow / Block List URLs
Each line should be a URL to a plain text with domains (and/or expressions) to block with. The format is the same as Pi-hole so all the lists used on Pi-hole can also be used here.
Alternatively, use Quick Add to add a recommended block lists.
Footnotes
The most common way to do this is through an HTTP challenge where the cert provider must be able to access your web server (and the cert client) publicly. For this you need to forward ports into your private network and your web server needs to be able to receive public-internet traffic. This is, obviously, what we are trying to avoid. Even if you do this once and then disable port forwarding the certs need to be renewed from time to time which makes this non-feasible for unattended maintenance. ↩︎
Kidding of course. CF Tunnels are super useful for protecting your network or when behind a CGNAT and can even be used alongside a reverse proxy. ↩︎